
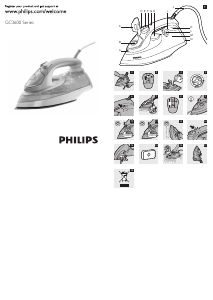
4 Regularly rinse the water tank with water. Empty the water tank after you
have rinsed it (Fig. 14).
Double-Active Calc System
The Double-Active Calc System consists of an Anti-Calc tablet inside the water tank
combined with the Calc-Clean function.
1 The Anti-Calc tablet prevents scale from clogging the steam vents. This tablet is
constantly active and does not need to be replaced (Fig. 15).
2 The Calc-Clean function removes the scale particles from the iron.
Calc-Clean function
Use the Calc-Clean function once every two weeks. If the water in your area is very
hard (i.e. when akes come out of the soleplate during ironing), use the Calc-Clean
function more frequently.
1 Set the steam control to position 0 and remove the mains plug from the wall
socket.
2 Fillthewatertanktothemaximumlevel.
Do not pour vinegar or other descaling agents in the water tank.
3 Set the temperature dial to MAX.
4 Put the mains plug in an earthed wall socket.
5 Unplug the iron when the temperature light goes out.
6 Hold the iron over the sink. Push the steam control to the CALC CLEAN
position and hold it. Gently shake the iron to and fro (Fig. 16).
, Steamandboilingwatercomeoutofthesoleplate.Impuritiesandakes(if
any)areushedout.
7 Release the steam control as soon as all the water in the tank has been used
up.
8 Repeat the Calc-Clean process if the iron still contains a lot of impurities.
After the Calc-Clean process
1 Put the plug back into the wall socket and let the iron heat up to let the
soleplate dry.
2 Unplug the iron when the temperature light goes out.
3 Move the iron gently over a piece of used cloth to remove any water stains
that may have formed on the soleplate.
4 Let the iron cool down before you store it.
Storage
1 Set the steam control to position 0, remove the mains plug from the wall
socket and let the iron cool down.
2 Wind the mains cord round the cord storage facility (Fig. 17).
Note: Make sure that the mains cord does not press down the handle during storage.
3 Store the iron on its heel in a safe and dry place.
Environment
- Do not throw away the appliance with the normal household waste at the end
of its life, but hand it in at an ofcial collection point for recycling. By doing this,
you help to preserve the environment (Fig. 18).
Guarantee & service
If you need service or information or if you have a problem, please visit the Philips
website at www.philips.com or contact the Philips Consumer Care Centre in your
country (you nd its phone number in the worldwide guarantee leaet). If there is no
Consumer Care Centre in your country, go to your local Philips dealer.
Troubleshooting
This chapter summarises the most common problems you could encounter with the
appliance. If you are unable to solve the problem with the information below, contact
the Consumer Care Centre in your country.
Problem Possible cause Solution
The iron is
plugged in, but
the soleplate
stays cold.
There is a connection
problem.
Check the mains cord, the plug and the
wall socket.
The temperature dial
is set to MIN.
Set the temperature dial to the required
position.
The iron does
not produce
any steam.
There is not enough
water in the water
tank.
Fill the water tank (see chapter
‘Preparing for use’, section ‘Filling the
water tank).
3 Set the appropriate steam setting. Make sure that the steam setting is
suitableforthesetironingtemperature(seechapter‘Preparingforuse’,table
‘Temperatureandsteamsettings’)(Fig.8).
Note: The iron is ready for steam ironing as soon as it has reached the set ironing
temperature.
Note: If the set ironing temperature is too low (MIN to 2), water may drip from the
soleplate (see chapter ‘Features’, section ‘Drip stop’).
1 Set the steam control to position 0 (= no steam) (Fig. 3).
2 Settherecommendedironingtemperature(seechapter‘Preparingforuse’,
table‘Temperatureandsteamsettings’).
Spray function
You can use the spray function to remove stubborn creases at any temperature.
1 Make sure that there is enough water in the water tank.
2 Press the spray button several times to moisten the article to be
ironed (Fig. 9).
Steam boost
A powerful steam boost helps to remove very stubborn creases.
The steam boost function can only be used at temperature settings between 3
and MAX.
1 Press and release the steam boost button (Fig. 10).
The concentrated steam boost from the long vents in the Steam Tip enhances the
distribution of steam into every part of your garment. The concentrated steam boost
function can only be used at temperature settings between 3 and MAX.
1 Press and release the steam boost button (Fig. 11).
Vertical steam boost
You can also use the steam boost function when you hold the iron in vertical position.
This is useful for removing creases from hanging clothes, curtains etc.
1 Hold the iron in vertical position and press and release the steam boost
button (Fig. 12).
Never direct the steam at people.
Drip stop
This iron is equipped with a drip-stop function: the iron automatically stops producing
steam when the temperature is too low, to prevent water from dripping out of the
soleplate. When this happens, you may hear a sound.
The automatic shut-off function automatically switches off the iron if it has not been
moved for a while.
, Theredauto-offlightashestoindicatethattheironhasbeenswitchedoffby
the automatic shut-off function (Fig. 13).
To let the iron heat up again:
1 Pick up the iron or move it slightly
, The red auto-off light goes out.
, If the temperature of the soleplate has dropped below the set ironing
temperature, the temperature light goes on.
2 If the temperature light goes on after you have moved the iron, wait for it to
go out before you start ironing.
Note: If the temperature light does not go on after you move the iron, the soleplate still
has the right temperature and the iron is ready for use.
Cleaning and maintenance
Cleaning
1 Set the steam control to position 0, remove the mains plug from the wall
socket and let the iron cool down.
2 Wipeakesandanyotherdepositsoffthesoleplatewithadampclothanda
non-abrasive (liquid) cleaning agent.
To keep the soleplate smooth, avoid hard contact with metal objects. Never use a
scouring pad, vinegar or other chemicals to clean the soleplate.
3 Clean the upper part of the iron with a damp cloth.





Bergabunglah dalam percakapan tentang produk ini
Di sini Anda dapat membagikan pendapat Anda tentang Philips GC3620 Setrika. Jika Anda memiliki pertanyaan, bacalah panduan dengan cermat terlebih dahulu. Meminta panduan dapat dilakukan dengan menggunakan formulir kontak kami.