Panduan Philips PQ216 Pencukur

Butuh manual untuk Philips PQ216 Pencukur Anda? Di bawah ini Anda dapat melihat dan mendownload manual PDF dalam bahasa Indonesia secara gratis. Produk ini saat ini memiliki 5 pertanyaan umum, 0 komentar dan memiliki 0 suara. Jika ini bukan panduan yang Anda inginkan, silakan hubungi kami.

Apakah produk Anda rusak dan panduannya tidak memberikan solusi? Buka Repair Café untuk layanan perbaikan gratis.

Panduan

, The charging light goes on to indicate that
the appliance is charging (Fig. 5).
4 Remove the shaver from the wall socket
when the battery is fully charged.
5 Press the release button (1) and fold the
foldable plug back into the appliance (2)
(‘click’) (Fig. 6).
Note: The light on the shaver does not change colour
and does not go out when the shaver is fully charged.
Cordless shaving time
A fully charged shaver has a cordless shaving
time of approximately 30 minutes.
Using the appliance
The shaver cannot be used directly from the
mains.
1 Remove the protection cap.
2 Push the on/off slide upwards to switch on
the shaver (Fig. 7).
3 Move the shaving heads over your skin. Make
both straight and circular movements (Fig. 8).
Note: Shave on a dry face only. Do not use the
shaver in combination with gel, foam or water.
Note: Your skin may need 2 or 3 weeks to get
accustomed to the Philips shaving system.
4 Push the on/off slide downwards to switch off
the shaver.
5 Clean the shaver after every shave, see
chapter ‘Cleaning and maintenance’.
6 Put the protection cap on the shaver after
use to prevent damage and to avoid dirt
accumulation in the shaving heads (Fig. 9).
Cleaning and maintenance
Never use scouring pads, abrasive cleaning
agents or aggressive liquids such as petrol or
acetone to clean the appliance.
Clean the shaver after every shave to guarantee
better shaving performance. For the best cleaning
result, we advise you to use Philips Cleaning Spray.
Ask your Philips dealer for information.
After every shave: shaving unit and
hair chamber
1 Switch off the shaver.
2 Clean the top of the appliance with the
cleaning brush supplied (Fig. 10).
3 Pull the shaving unit straight up off the
shaver (Fig. 11).
4 Clean the inside of the shaving unit with the
cleaning brush (Fig. 12).
5 Clean the hair chamber with the cleaning
brush (Fig. 13).
6 Put the shaving unit back onto the
shaver (Fig. 14).
ENGLISH
Introduction
Congratulations on your purchase and welcome
to Philips! To fully benet from the support
that Philips offers, register your product at
www.philips.com/welcome.
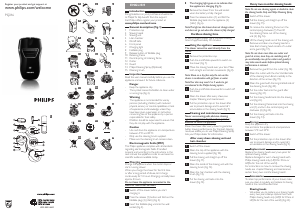
General description (Fig. 1)
1 Protection cap
2 Shaving heads
3 Shaving unit
4 Hair chamber
5 On/off slide
6 Front panel
7 Charging light
8 Foldable plug
9 Release button of foldable plug
10 Retaining frame
11 Central spring of retaining frame
12 Cutter
13 Guard
14 Philips Cleaning Spray (Optional)
15 Cleaning brush
Important
Read this user manual carefully before you use the
appliance and save it for future reference.
Danger
- Keep the appliance dry.
- This symbol means: Forbidden to clean under
a running tap (Fig. 2).
Warning
- This appliance is not intended for use by
persons (including children) with reduced
physical, sensory or mental capabilities, or lack
of experience and knowledge, unless they
have been given supervision or instruction
concerning use of the appliance by a person
responsible for their safety.
- Children should be supervised to ensure that
they do not play with the appliance.
Caution
- Use and store the appliance at a temperature
between 5°C and 35°C.
- Only use the cleaning brush supplied.
- Make sure the cleaning brush remains clean.

This Philips appliance complies with all standards
regarding electromagnetic elds. If handled
properly and according to the instructions in this
user manual, the appliance is safe to use based on
scientic evidence available today.
Charging
Charge the appliance when the motor stops or
starts running slower.
When you charge the shaver for the rst time
or after a long period of disuse, let it charge
continuously for 12 hours. Charging normally takes
approx. 8 hours.
Do not leave the appliance connected to the
mains for more than 24 hours.
1 Switch off the shaver before you start
charging it.
2 Press the release (1) button and fold out the
foldable plug (2) (‘click’) (Fig. 3).
3 Insert the foldable plug unit into the wall
socket (Fig. 4).
Every two months: shaving heads
Note: Do not use cleaning agents or alcohol to clean
the shaving heads. Only use Philips Cleaning Spray.
1 Switch off the shaver.
2 Pull the shaving unit straight up off the
shaver (Fig. 15).
3 To remove the retaining frame, turn the
central spring clockwise (1).Then lift
the retaining frame out of the shaving
unit (2) (Fig. 16).
4 Lift the shaving heads out of the shaving unit.
Remove and clean one shaving head at a
time. Each shaving head consists of a cutter
and a guard (Fig. 17).
Note: Do not clean more than one cutter and
guard at a time, since they are matching sets. If
you accidentally mix up the cutters and guards, it
may take several weeks before optimal shaving
performance is restored.
5 Remove the guard from the cutter (Fig. 18).
6 Clean the cutter with the short-bristled side
of the cleaning brush. Brush carefully in the
direction of the arrows (Fig. 19).
7 Clean the guard with the long-bristled side of
the cleaning brush (Fig. 20).
8 Put the cutter back into the guard after
cleaning (Fig. 21).
9 Put the shaving heads back into the shaving
unit (Fig. 22).
10 Put the retaining frame back into the shaving
unit (1), and turn the central spring anti
clockwise (2) (Fig. 23).
11 Put the shaving unit back onto the
shaver (Fig. 14).
Storage
Keep the appliance dry.
Use and store the appliance at a temperature
between 5°C and 35°C.
1 Switch off the shaver.
2 Put the protection cap on the shaver after
use to prevent damage and to avoid dirt
accumulation in the shaving heads (Fig. 9).
Replacement
Replace the shaving heads every two years for
optimal shaving results.
Replace damaged or worn shaving heads with
Philips shaving heads only (HQ4 for China or
HQ56 for the rest of the world).
For instructions on how to remove the shaving
heads, see chapter ‘Cleaning and maintenance’,
section ‘Every two months: shaving heads’.
Accessories
To retain top performance of your shaver, make
sure you clean it regularly and replace its shaving
heads at the recommended time.
Shaving heads
- We advise you to replace your shaving heads
every two years. Always replace them with
Philips shaving heads only (HQ4 for China or
HQ56 for the rest of the world) (Fig. 24).
PQ216
Register your product and get support at
www.philips.com/welcome
4222.002.5463.1
1
2
3 4
5
6 7
8 9
10
11
12 13
14
15 16
17
18 19
20 21
22
23
24 25
26
27 28
Unduh panduan dalam bahasa Indonesia (PDF, 1.5 MB)
(Pertimbangkan lingkungan dan hanya cetak panduan ini jika benar-benar diperlukan)

Rating

Beri tahu kami pendapat Anda tentang Philips PQ216 Pencukur dengan meninggalkan rating produk. Ingin berbagi pengalaman Anda dengan produk ini atau mengajukan pertanyaan? Silakan tinggalkan komentar di bagian bawah halaman.
Apakah Anda puas dengan Philips PQ216 Pencukur?
Ya Tidak
Jadilah orang pertama yang menilai produk ini
0 pilihan

Bergabunglah dalam percakapan tentang produk ini

Di sini Anda dapat membagikan pendapat Anda tentang Philips PQ216 Pencukur. Jika Anda memiliki pertanyaan, bacalah panduan dengan cermat terlebih dahulu. Meminta panduan dapat dilakukan dengan menggunakan formulir kontak kami.

Selengkapnya tentang panduan ini

Kami memahami bahwa menyenangkan memiliki panduan cetak Philips PQ216 Pencukur Anda. Anda selalu dapat mengunduh panduan dari situs web kami dan mencetaknya sendiri. Jika Anda ingin memiliki panduan asli, kami sarankan Anda menghubungi Philips. Mereka mungkin dapat memberikan panduan asli. Apakah Anda mencari panduan untuk Philips PQ216 Pencukur Anda dalam bahasa lain? Pilih bahasa pilihan Anda di beranda kami dan cari nomor model untuk melihat apakah kami menyediakannya.

Spesifikasi

Merek Philips
Model PQ216
Kategori Pencukur
Jenis file PDF
Ukuran file 1.5 MB

Semua panduan untuk Philips Pencukur
Lebih banyak panduan untuk Pencukur

Pertanyaan umum tentang Philips PQ216 Pencukur

Tim dukungan kami mencari informasi produk yang berguna dan jawaban atas pertanyaan umum. Jika Anda menemukan ketidakakuratan dalam pertanyaan umum kami, harap beri tahu kami melalui formulir kontak kami.

Seberapa sering saya harus membersihkan kepala pencukur pada alat cukur Philips saya? Diverifikasi

Philips merekomendasikan untuk melakukan ini setiap dua bulan. Pembersihan rutin akan meningkatkan umur perangkat.

Ini sangat membantu (250) Baca selengkapnya

Berapa lama kepala pencukur bertahan sebelum perlu diganti? Diverifikasi

Tergantung seberapa sering digunakan, kepala pencukur dapat bertahan antara 6 bulan hingga 2 tahun. Untuk memastikan hasil optimal, sebaiknya ganti kepala pencukur setahun sekali.

Ini sangat membantu (201) Baca selengkapnya

Ke arah mana saya harus mencukur? Diverifikasi

Dalam kebanyakan kasus, disarankan untuk mencukur sesuai arah pertumbuhan rambut. Hal ini mengurangi risiko iritasi kulit dan rambut tumbuh ke dalam.

Ini sangat membantu (174) Baca selengkapnya

Apa perbedaan antara kepala pencukur yang bergetar dan berputar? Diverifikasi

Hal ini sebagian besar merupakan masalah kebutuhan dan preferensi pribadi, namun secara umum dapat dikatakan bahwa bilah pada kepala pencukur yang bergetar bergerak lebih cepat sehingga memberikan hasil yang lebih cepat. Kepala pencukur yang berputar dapat menjangkau area tertentu di wajah dengan lebih mudah.

Ini sangat membantu (155) Baca selengkapnya

Di mana saya dapat menemukan model dan/atau nomor seri alat cukur Philips saya? Diverifikasi

Nomor model dapat ditemukan di bagian belakang perangkat. Terkadang nomor seri juga terletak di bagian belakang perangkat, selain itu nomor seri juga dapat ditemukan di bawah alat pemotong atau di ruang rambut.

Ini sangat membantu (122) Baca selengkapnya
Panduan Philips PQ216 Pencukur

Produk-produk terkait

Kategori terkait